Main skills: clay modeling, paper cutting, resin pouring
My ‘Secret Reef’ was inspired by some amazing miniature reefs inside of Altoid tins that I saw on Pinterest. I had also been wanting to make a secret compartment book, so I decided to combine the two. I wanted to choose a book that was on-theme. I went with ‘The Happy Isles of Oceania” by Robert Theroux, which I had on my book shelf.
I had fun creating a bunch of coral and rocks so I would have lot to choose from when I was setting up the reef. And of course the pink octopus is in the center of the composition. It’s his ‘octopus’s garden.’ When I was happy with the composition I filled the depression with clear resin. I was a little disappointed to discover that the resin really flattened the look of the reef (a lot of the depth was lost). Also a lot of the surface detail I had added to the coral and rocks was obscured by the resin.
I was making this piece for my nine year old niece, so I added one of my favorite, inspiring, Picasso quotes to the inside cover- ‘Everything you can imagine is real.’
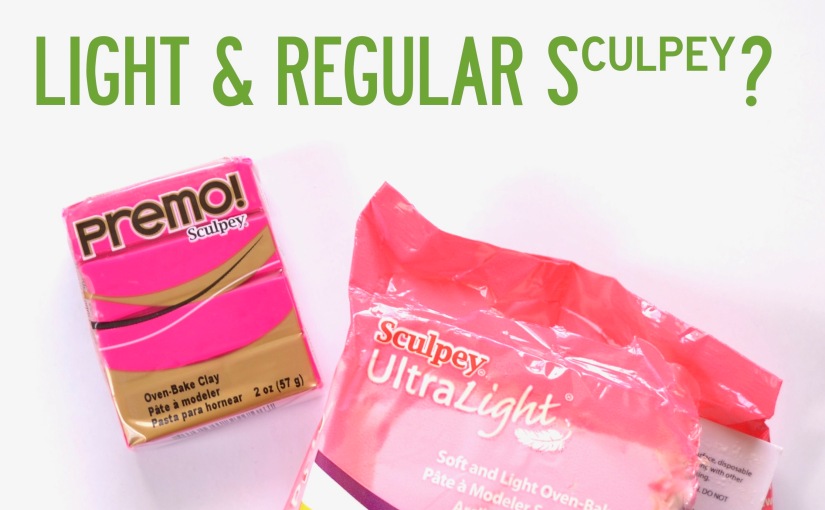
I was recently wondering whether you could mix regular Sculpey polymer clay and Sculpey Ultra Light. Sculpey Ultra Light has some advantages: it is softer to work (pliable and almost stretchy) it’s light weight, it floats, and most importantly for me it does not crack when baked in large pieces. Regular/Premo Sculpey will likely crack after baking the piece is too thick.
The downside to Sculpey Ultra Light is that it only comes in white, and it’s almost a little too soft and pliable for my liking. It has trouble holding a shape before baking.
Regular/Premo Sculpey polymer clay, on the other hand, comes in so many wonderful colors and is quite firm.
So can you mix the two and take advantage of all of their good qualities?
One obvious caveat is the differing baking instruction. Both bake at the same temperature, but Ultra Light’s instructions say to bake it for half of the time of Regular/Premo Sculpey. If we mix the two together can we average the baking time too? (22 min/ ¼”?)
I took equal parts Ultra Light Sculpey and Fuchsia Premo Sculpey and thoroughly mixed them together.
As you can see, the Fuschia color lightened up a bit but not much. Also the mixture maintained it’s softness and pliability/stretchiness.
I rolled out a snake, stretched it a little and wrapped it into a knot to see if it would hold it’s shape until I got it to the oven. I also cut a star out of a slab to see how it performed in a thinner piece. I baked the star for 22 minutes, and the knot for 60 minutes (it was ¾” thick).
After allowing the pieces to cool I tested them. They had both successfully hardened in the oven. The larger piece did not crack after cooling. I dropped them from a distance of about 4′ onto a wood floor and they did not break. They were not brittle.
But did they still float? Yes!!
Mixing Ultra Light Sculpey and regular/Premo Sculpey at a 1:1 ratio was a total success in my opinion! I hope this encourages you to mix these clays, and try different ratios and baking times. Thanks so much for stopping by!
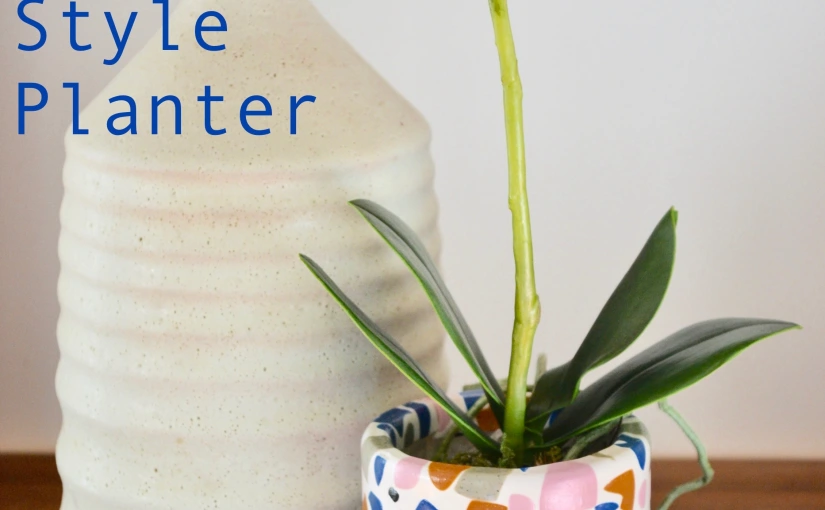
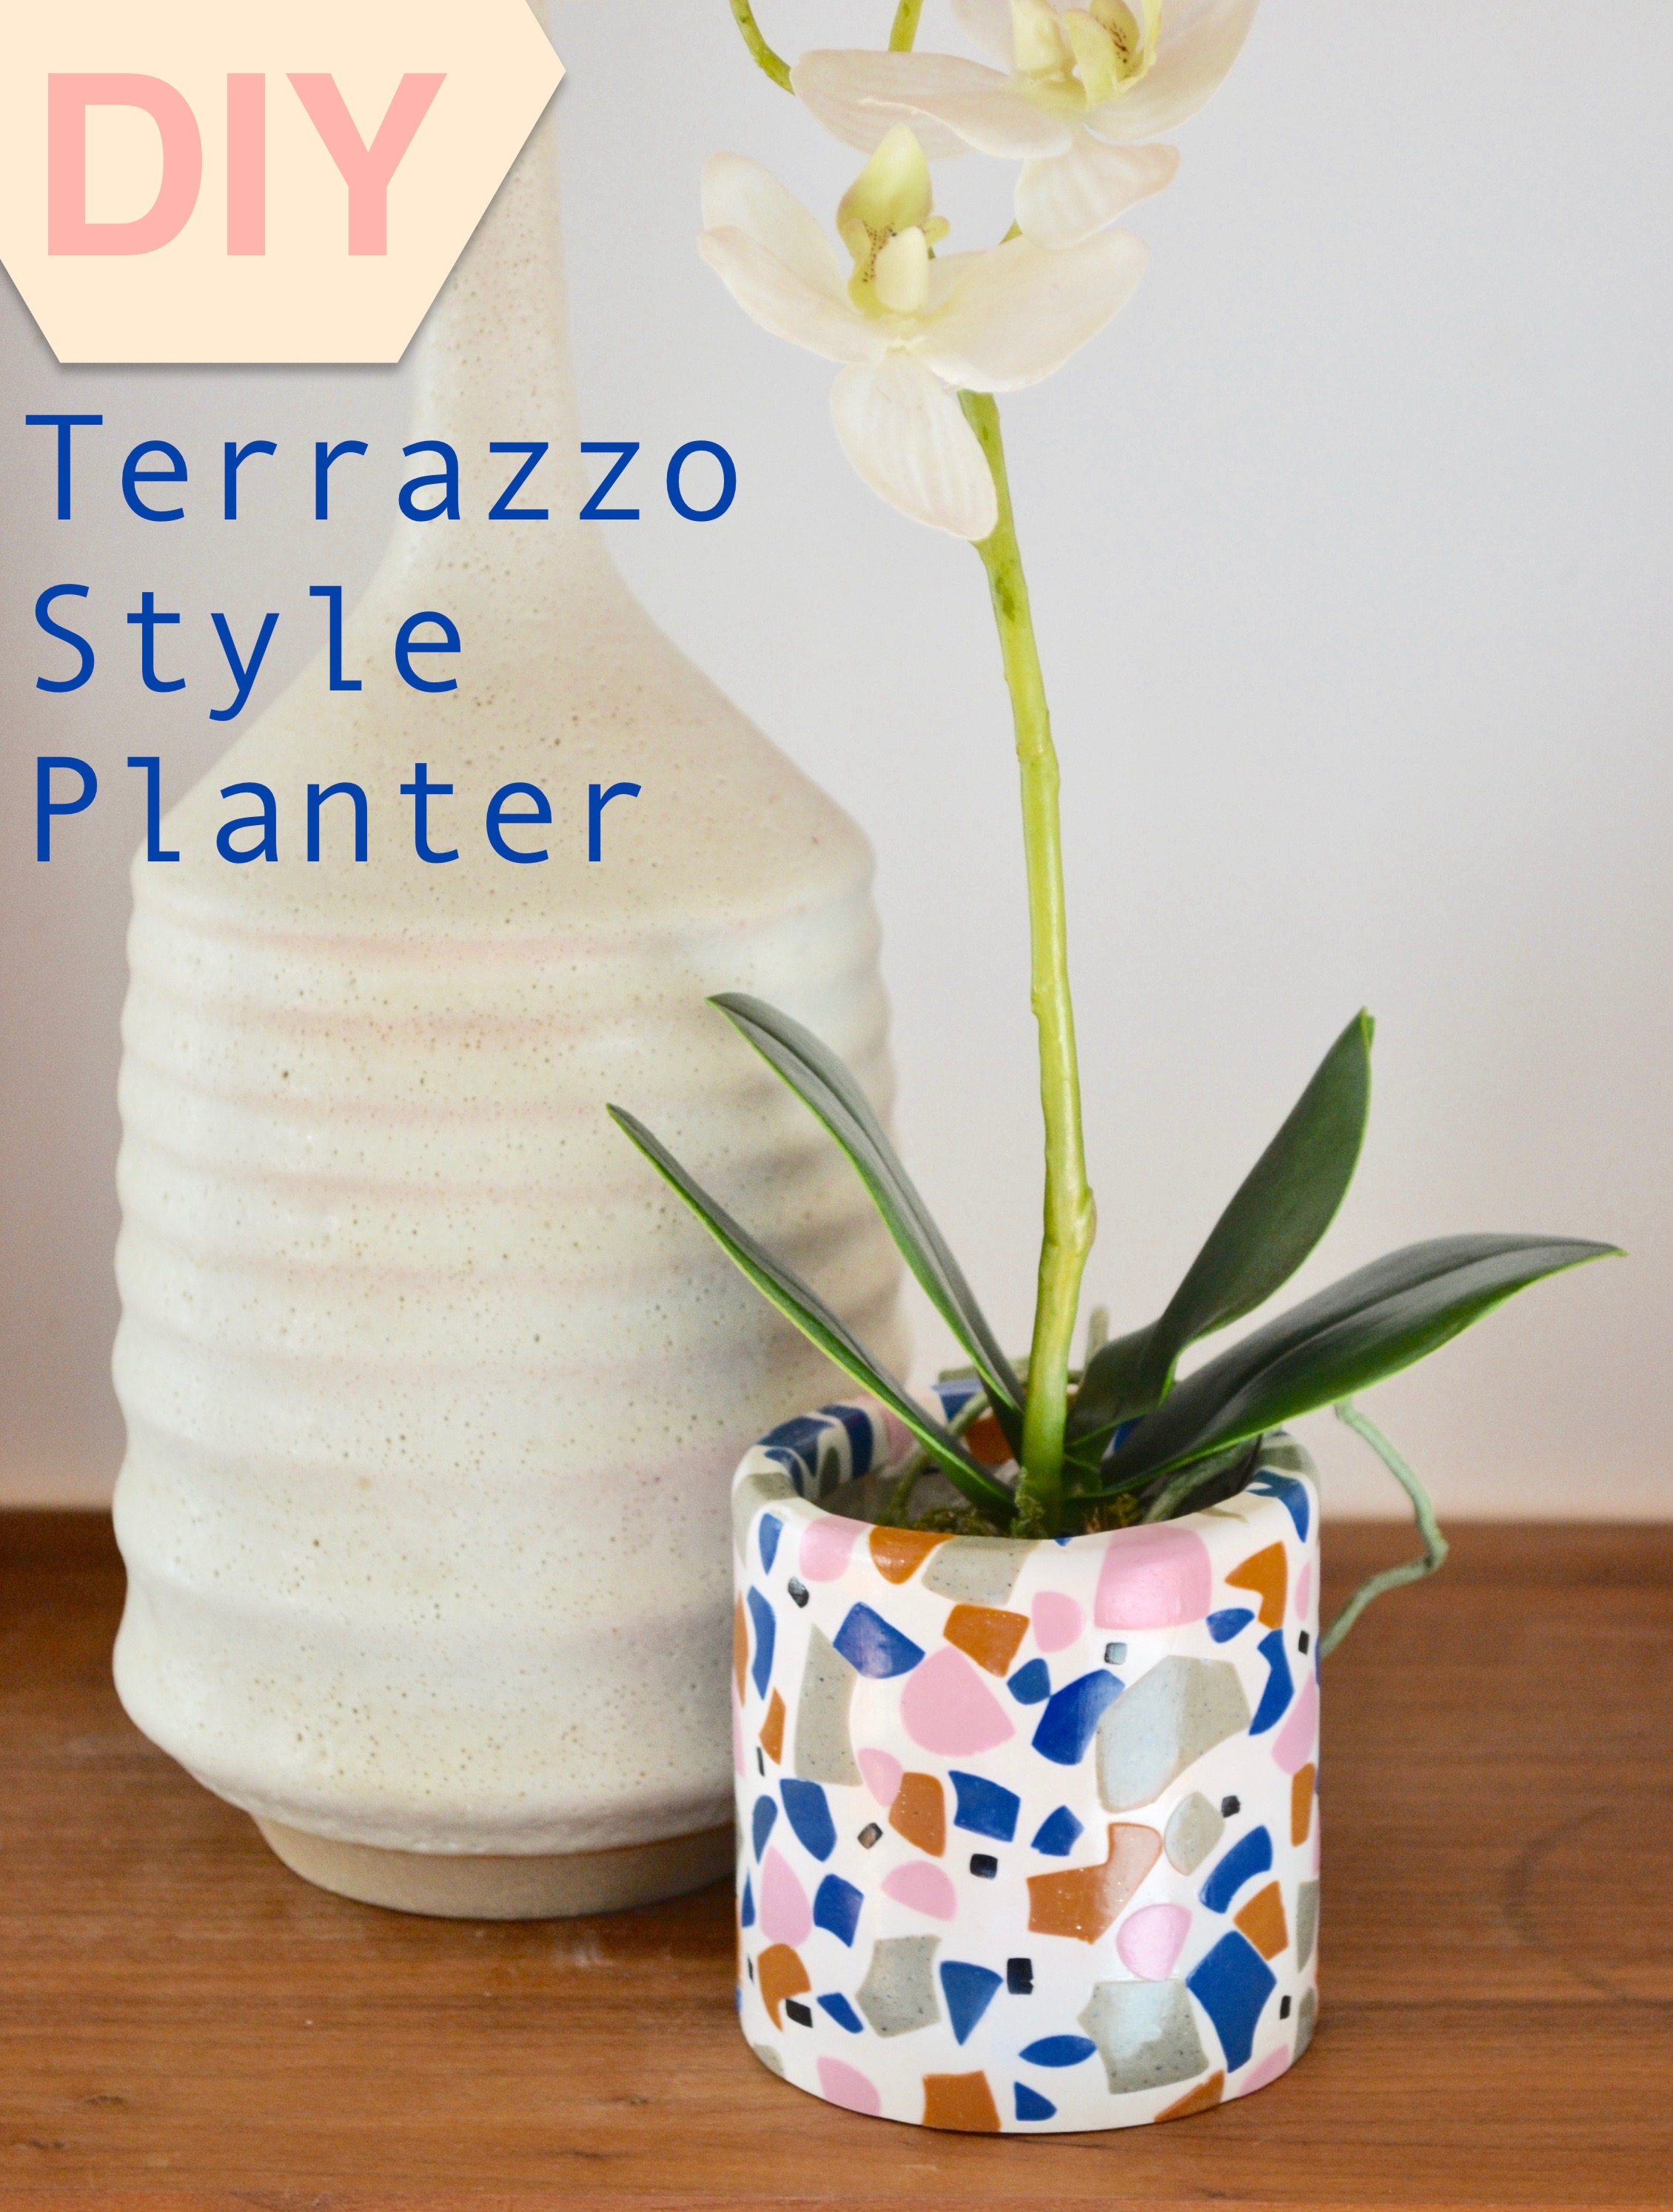
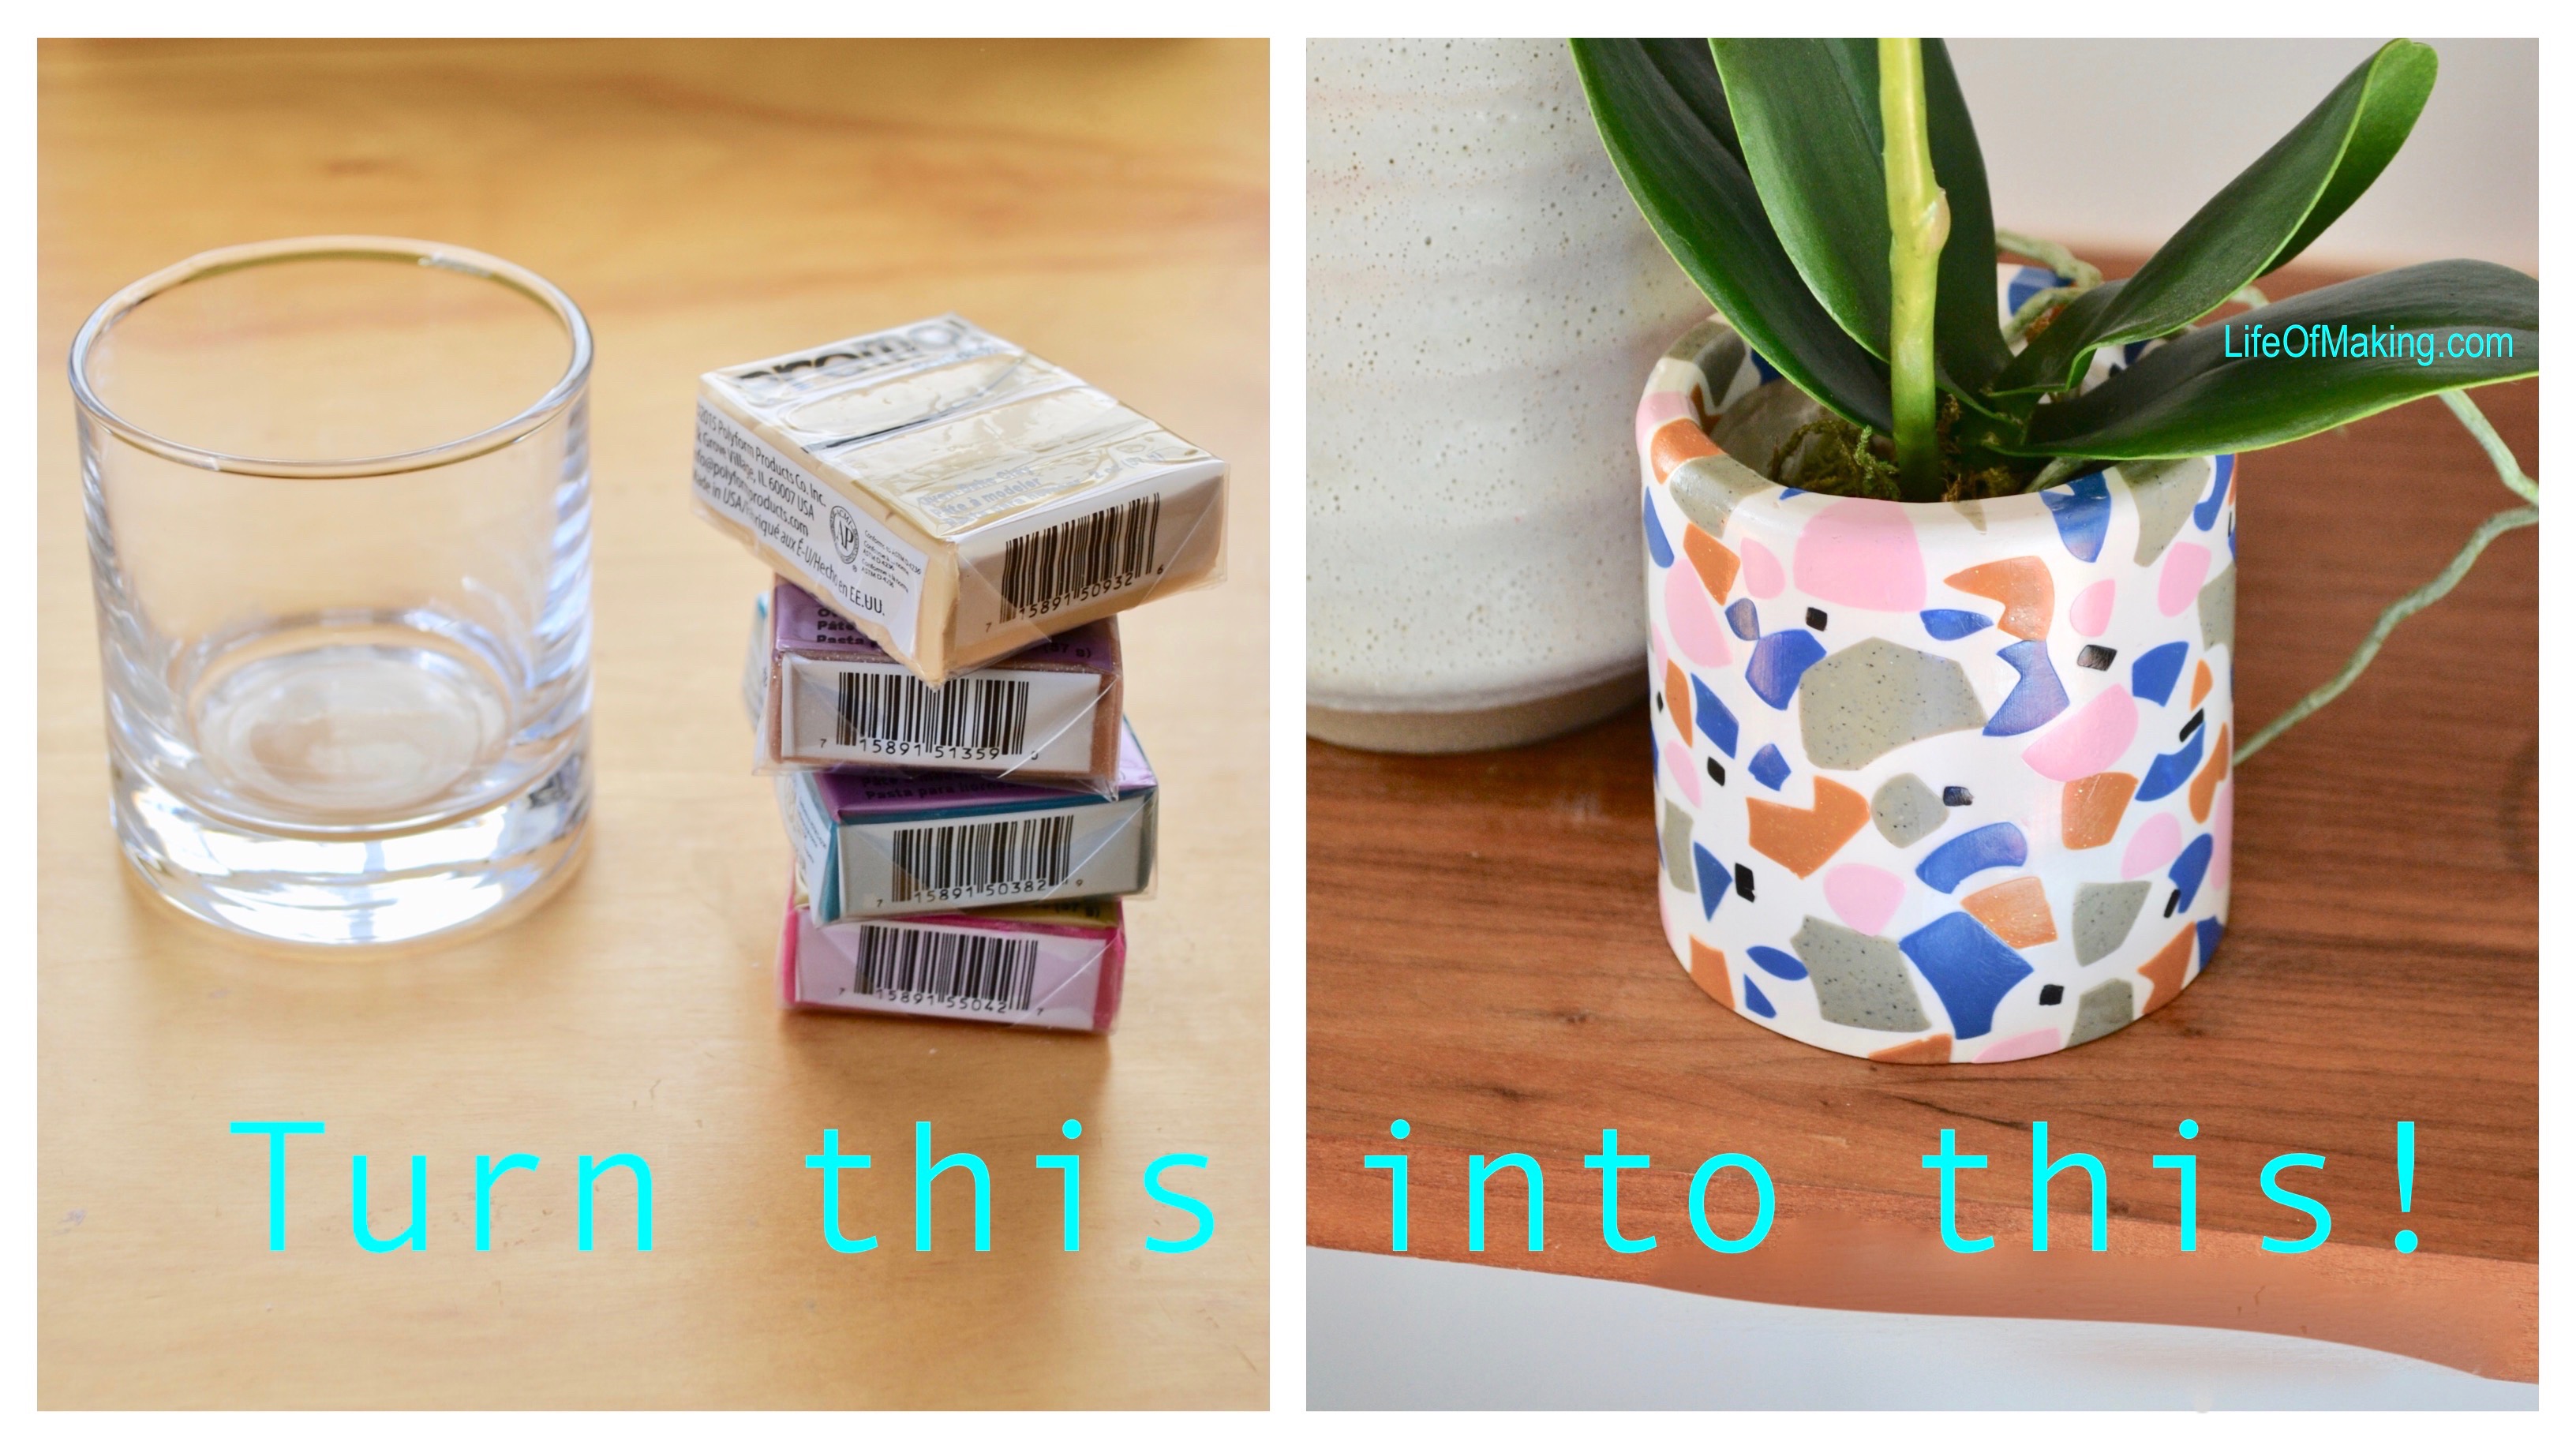
Every spring I get on a little houseplant kick- looking for cool plants and beautiful planters to put them in. Now you can make your own terrazzo-style planter! Claim a piece of the amazing terrazzo trend and customize your planter to your liking!
We will be using an empty container as the base for our planter. Pick one that has smooth sides, and does not taper in or out (is straight up and down). I found that empty glass candle containers fit the bill nicely. Clean thoroughly, and wipe down with alcohol to remove any residual oils.
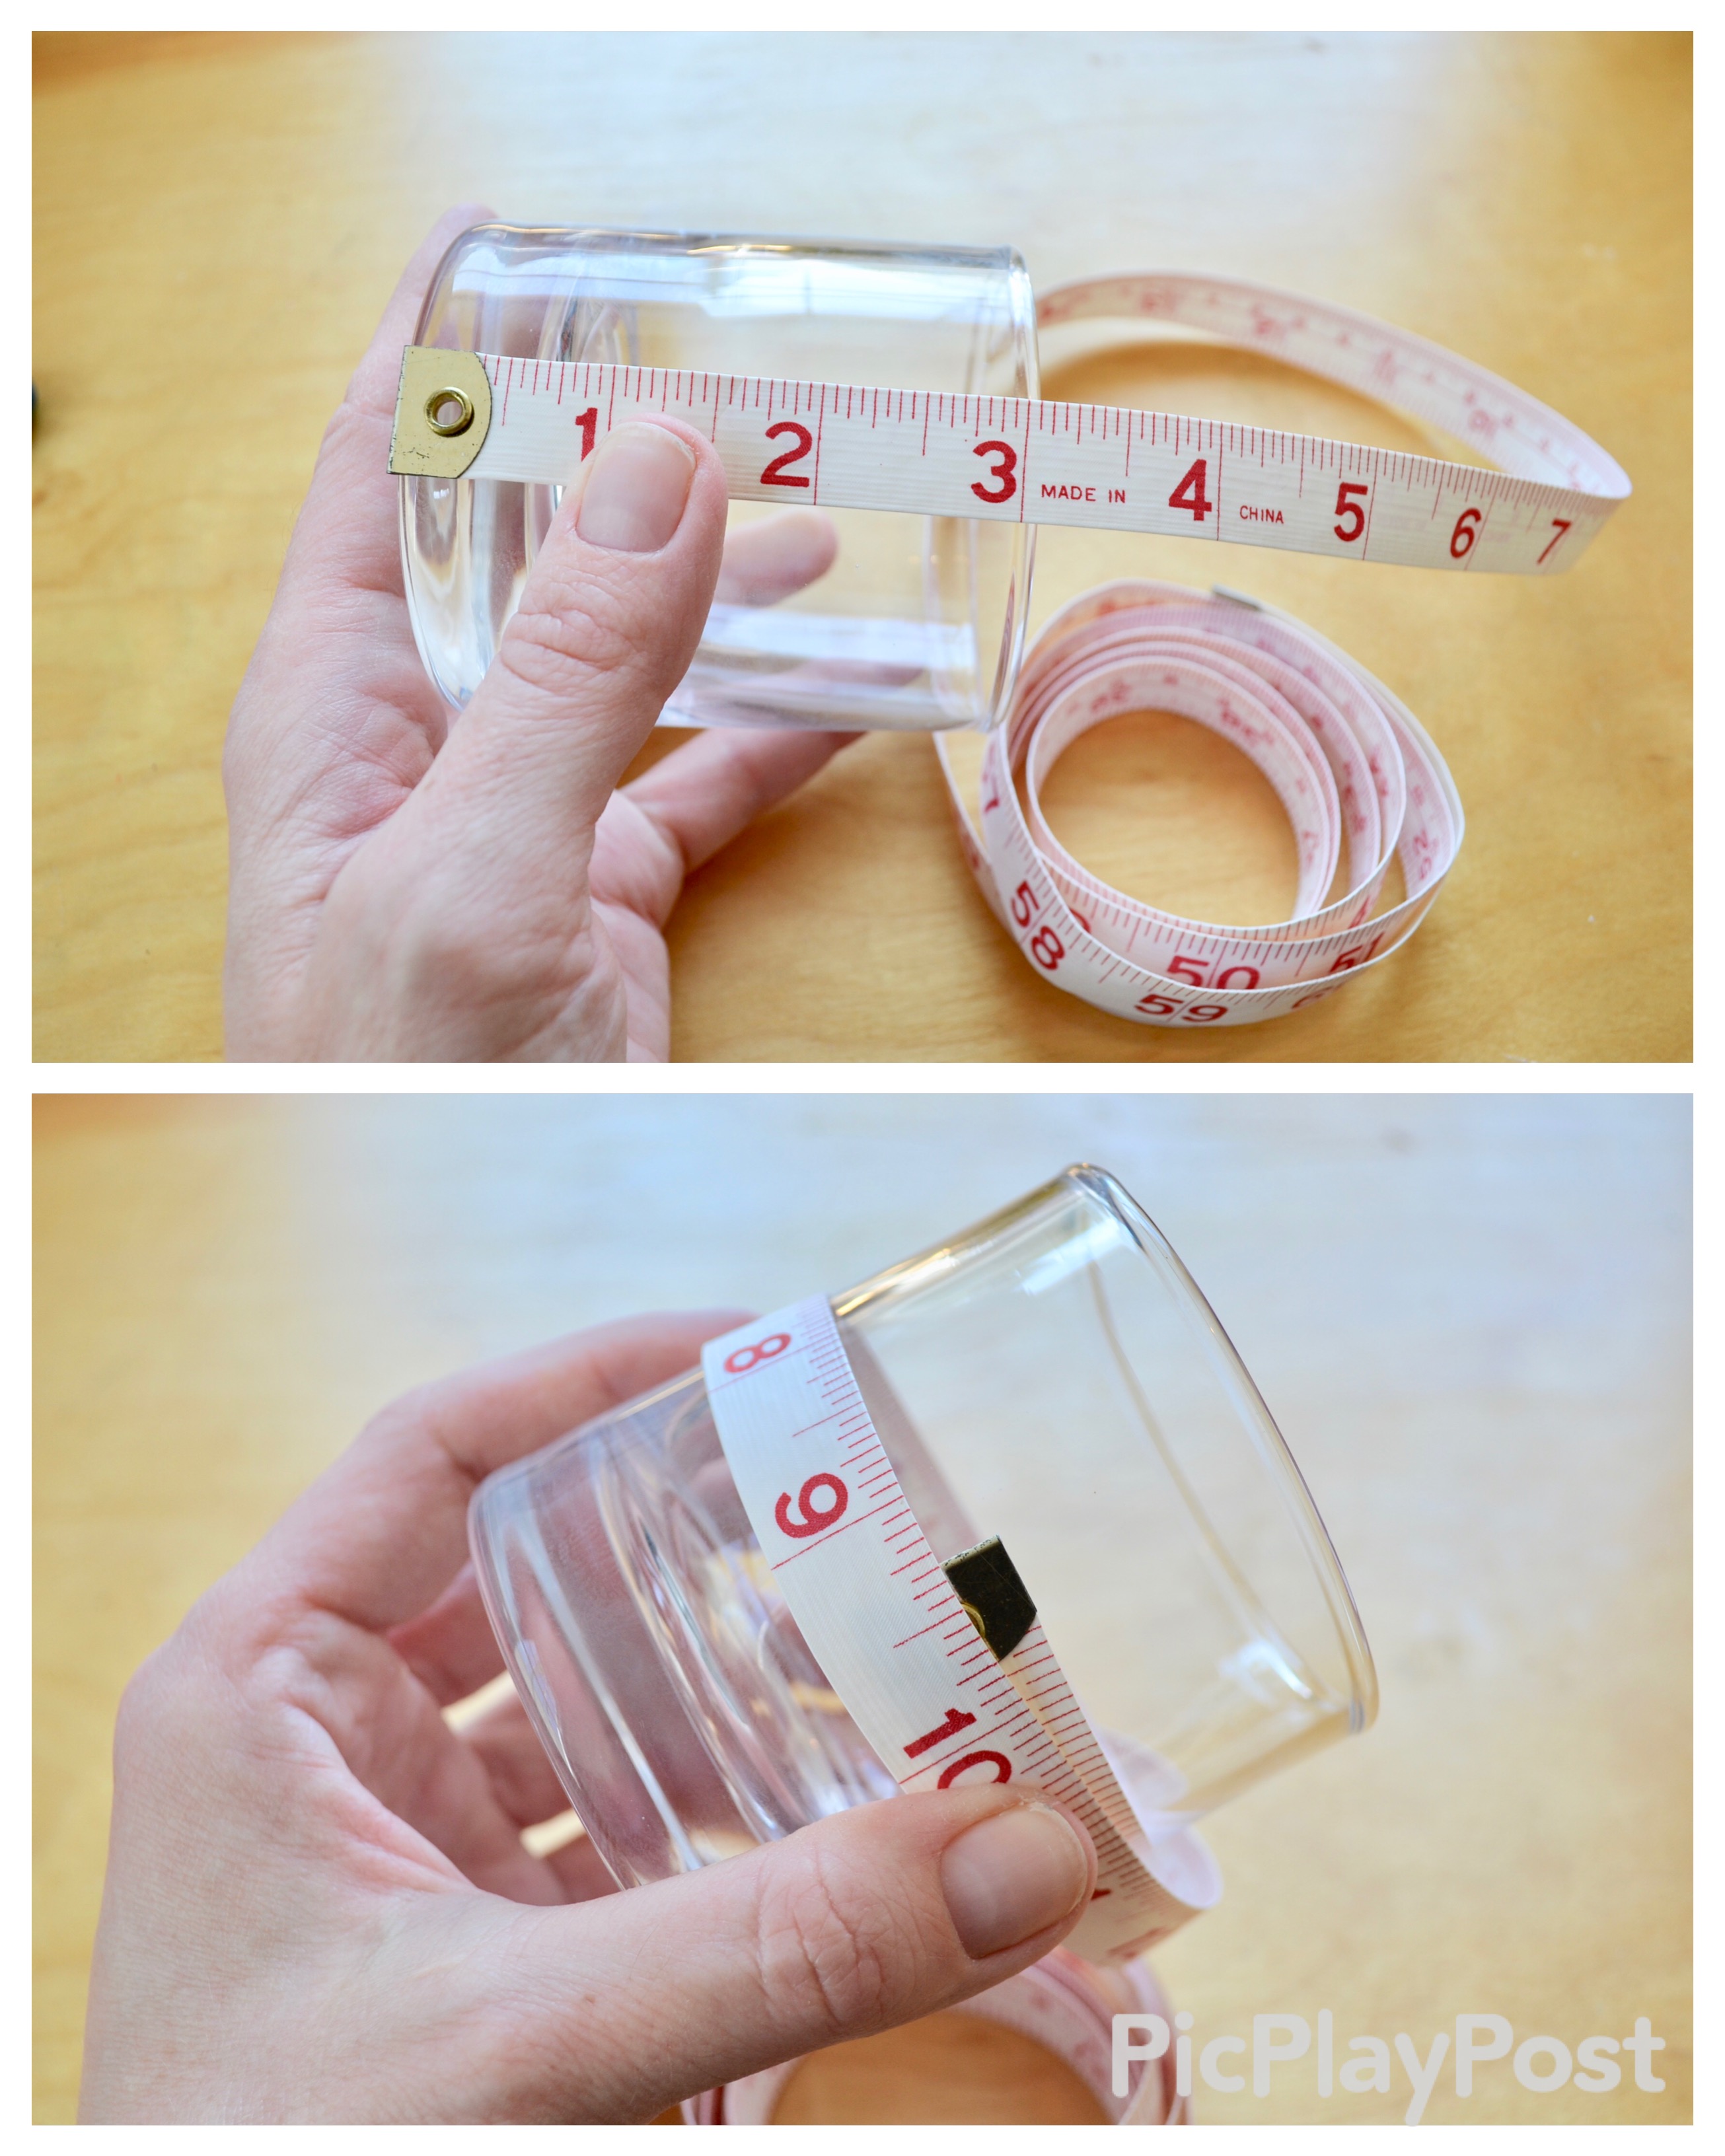
Measure the height and circumference of your container. For my container in the photos the measurements were 3” high and 9.25” around. We need these measurements to determine how big a slab of clay we will need in order to cover the entire container.
We are going to make a paper template for the size of the slab we will need by cutting a rectangle out of a piece of heavy paper (this extra step will make your life easier, I promise). You want the height of the rectangle to be the height of your container + ½” (example: 3” + 1/2” = 3.5”). The length of the paper rectangle should be the circumference + 1” (example: 9.25” + 1” = 10.25).
Wrap the paper template around your container. Ideally it will be ½” taller and will wrap all the way around with an overlap of 1” or so.
The following instructions are useful if you are covering a larger planter, or you have to go buy polymer clay and you are wondering how much you need. If you want you can alternately just roll out a slab of clay and see if its big enough. If it’s not you will need to add clay and roll it out again.
To determine how much polymer clay you will need for the base slab, follow these instructions- Determine how many square inches you are going to need (example: 3.5” x 10.25” = about 36 inches squared). We want a slab that is about 1/8” thick.
A standard block of Sculpey measures 1.75”D x 2.25”W which equals 4 square inches. A block of Sculpey is ¾” thick, which yields 6 layers at 1/8” thick. 4 in. sq. x 6 = 24 in. sq. This means that 1 block of Sculpey will yield a 24 in. sq. slab at 1/8” thick.
For the example, we have determined that we need 36 in. sq., so divide 36 by 24 and you get how many blocks you need (example: 36/24 = 1.5 blocks). You should add about a half block more because you will not be able to roll out a perfect rectangle. In conclusion I have determined that I will need 2 blocks of Sculpey for the base slab.
Pick out and/or mix some colors that you like together. A quick pinterest search on color combinations will yield many great suggestions. You will need about ¼ block – ½ block of clay per color. Here I used Sculpey Premo in Granite and mixed it with a tiny bit of black to make it a bit darker. A good mix- some neutrals, some lighter, some darker- is good to remember. Condition your clay and set aside.
Tear a square of waxed paper and fold in half.
Take a color, and run it through your pasta machine on setting 5 (or roll out a very thin pancake). Gently lay it on the wax paper, to one side of the fold. Fold over the wax paper to cover the pancake and smooth over the surface with a roller to flatten.
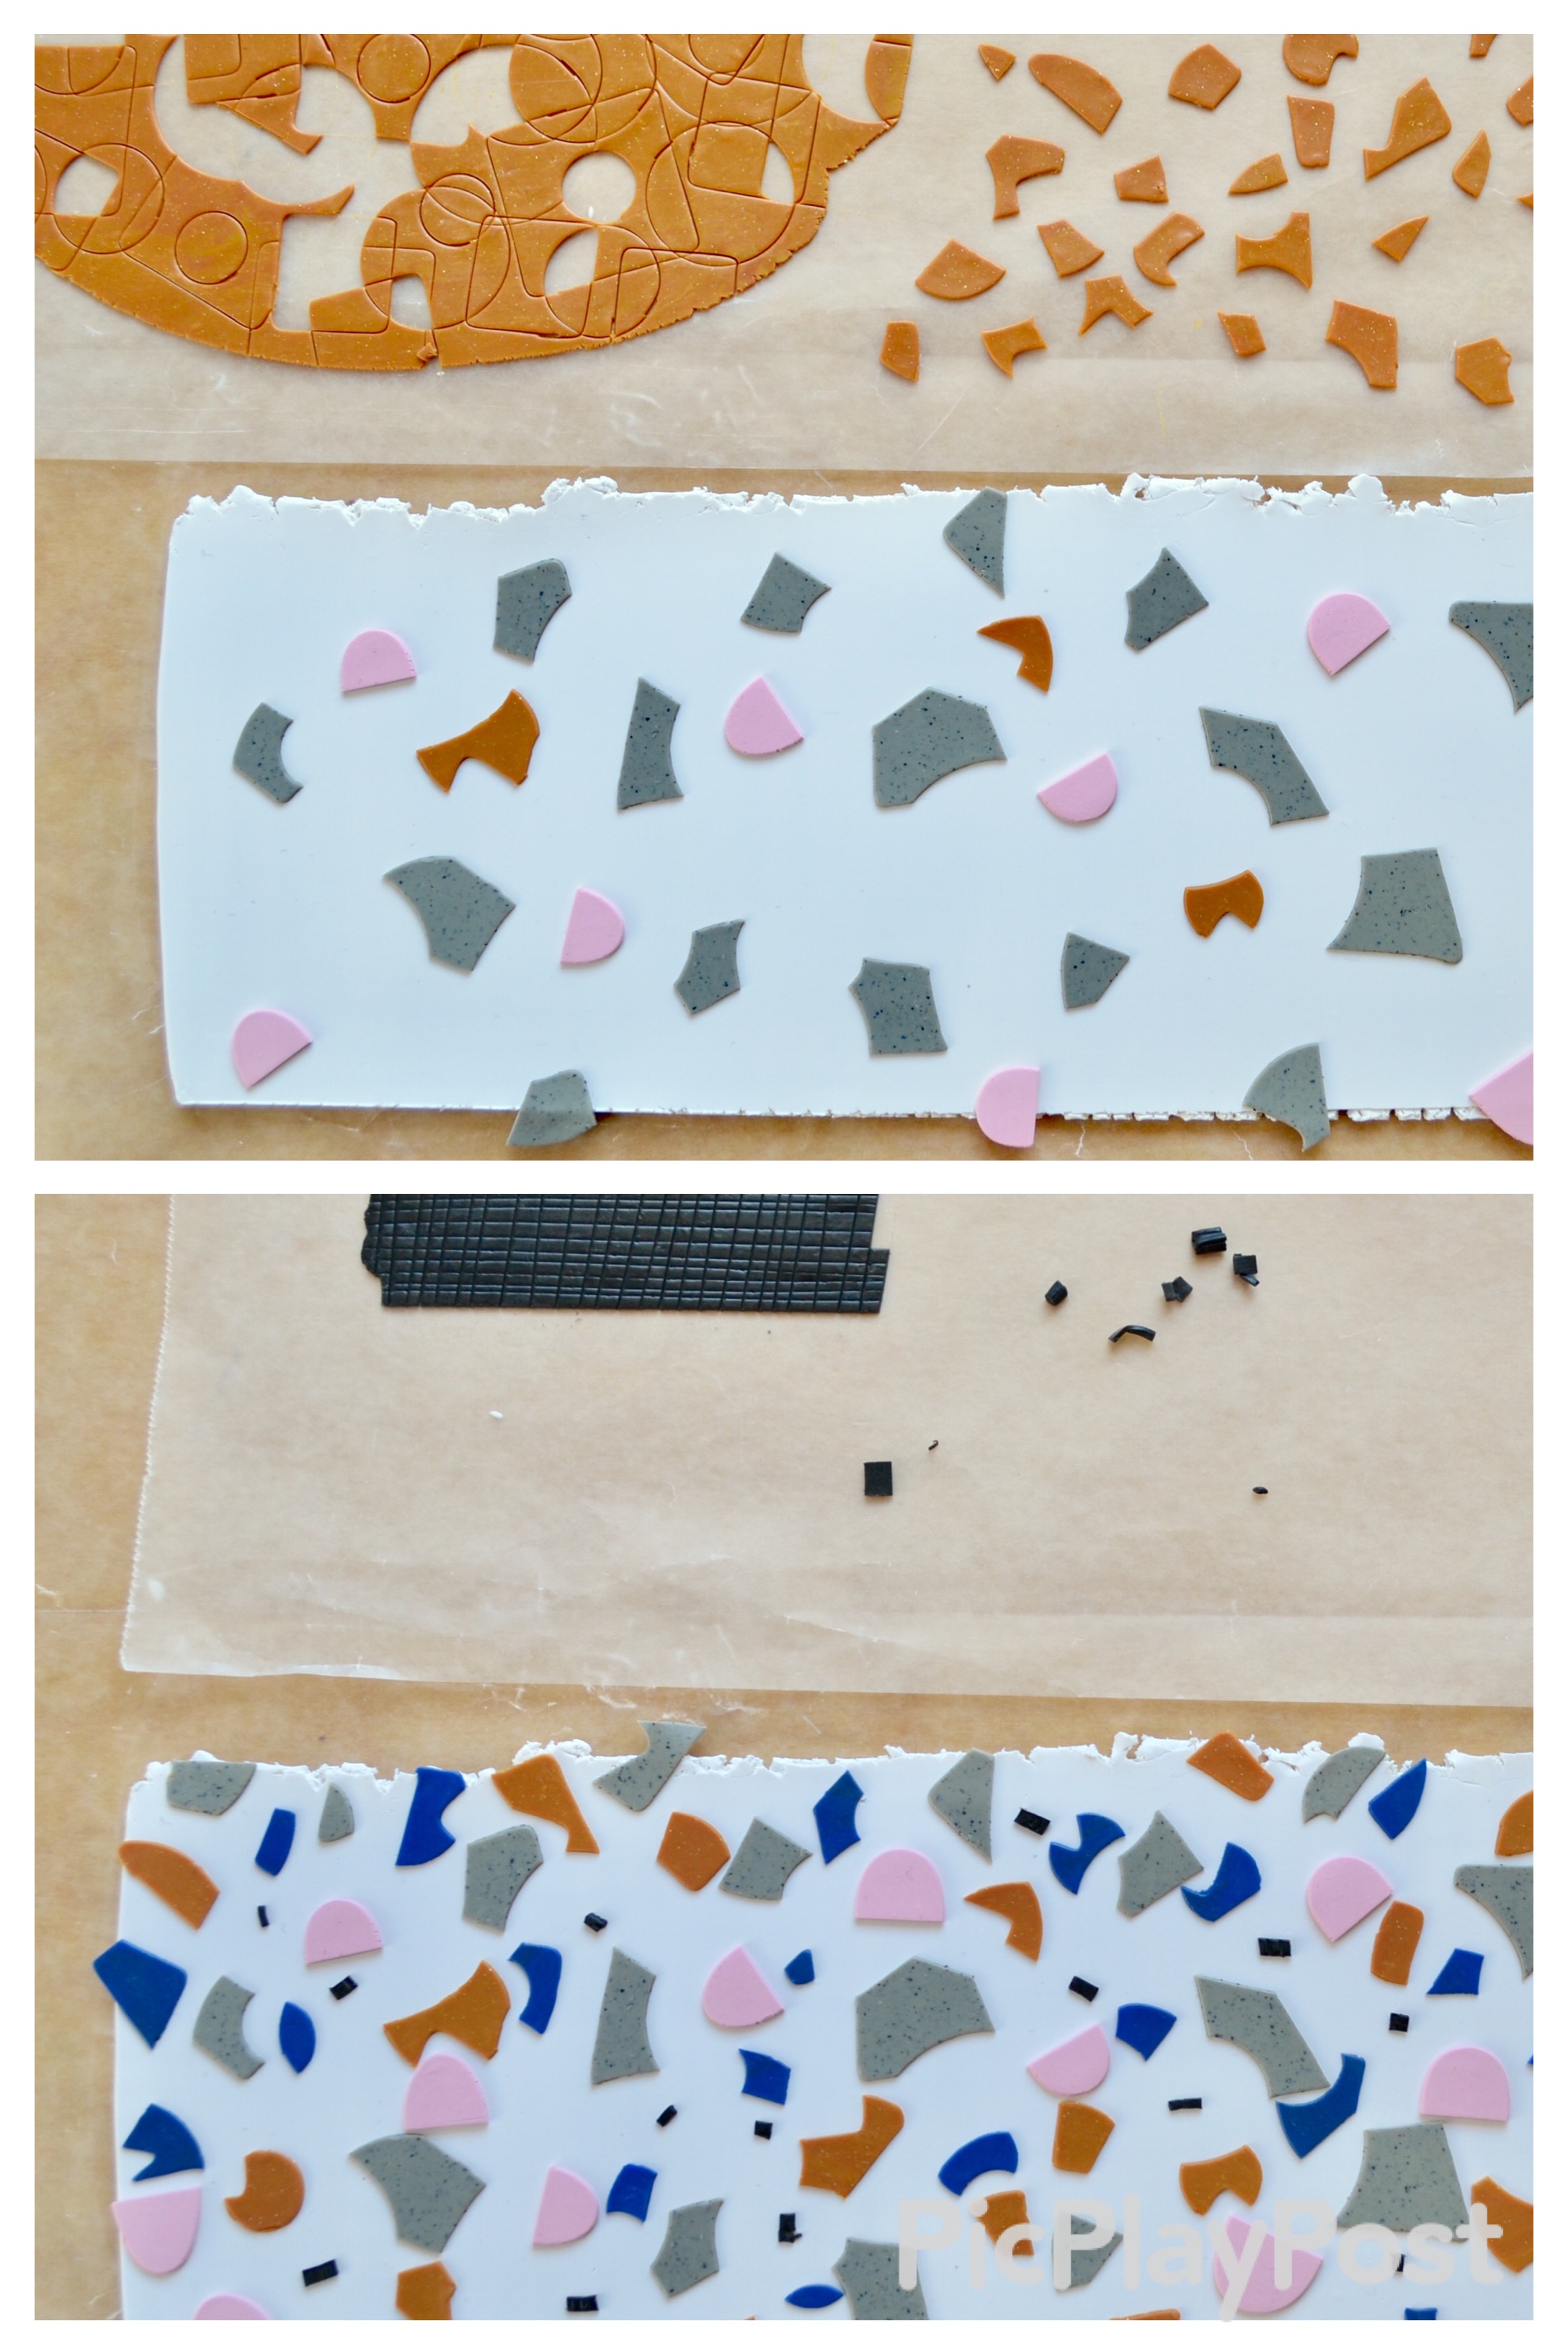
Gather some small cookie cutters in simple shapes. Here I am using circles and squares ranging in size from 3/8” to 1.5”.
Start randomly punching shapes in you pancake. Switch up you sizes and shapes and keep punching. You want to layer the shapes until you see possible shapes appearing in the voids and overlaps.
Gently start picking out those shapes and placing them next to the pancake. If while you are doing this you need to punch more cookie cutter shapes, please do! Pick out a good number. If you don’t have enough you can always pick out more later.
Fold the wax paper back over and place in a safe location for later.
Follow the same steps for another color. With the blue, I wanted slightly larger shapes, so I didn’t punch as many ciscles and squares with the cookie cutters.
I also wanted larger shapes in the granite clay so I did the same. Also it will sometimes make sense to cut a straight line through your pancake to yield the shapes and sizes you want.
I wanted a different kind of shape for the pink pieces, so I made small balls and ran them through the pasta machine. Alternately you could roll out the balls with a rolling pin.
This created ovals, which I cut in half. Place on folded wax paper and set aside.
Lastly I wanted some small pieces of the black clay. I placed a thin sheet (pasta machine setting 5) on a piece of waxed paper. I cut closely spaced parallel lines with a tissue blade. Then I did the same in the other direction, modifying the angle of me blade a bit to create different sizes. Leave in place and cover with waxed paper.
We previously determined that I would need 2 blocks of Sculpey for my base slab. I am going to mix white and translucent white Sculpey Premo. I mix translucent into most pieces I make out of polymer clay. It seems to lend them a little more depth, so they don’t look as flat, and it doesn’t seem to change the color intensity either.
Roll out a rectangular-ish slab that is about and 1/8” thick. If you are using a pasta machine you may roll out 2 slabs on the 1 setting and layer them to make a thicker slab.
Since you have your paper template for the size you will be needing, you can easily check to see if the initial slab that you are rolling out is large enough. Once you have rolled out a large enough slab, trim any major excess off.
Gather your prepared shapes around your slab.
Now you will start to arrange your shapes across your slab. It is a good idea to begin with the larger pieces and move to the smaller pieces. This makes it easier to fit more shapes and once you put a shape down on the slab you will not want to move it unless absolutely necessary.
Here I placed the grey shapes somewhat evenly across the slab, then came in with the pink half-ovals.
Then I placed the caramel brown, then the blue shapes and lastly the small black specks. Try to step back periodically and take in the appearance of the entire slab. Does it look balanced and random? That is what you are going for. Also are the pieces as dense as you’d like? If not go back in and try to fit in more pieces.
While you are placing shapes on the slab, remember that you want the entire composition of the “terrazzo” to look uniform, with no edge. You can achieve this by going “past the edge” as you place the shapes.
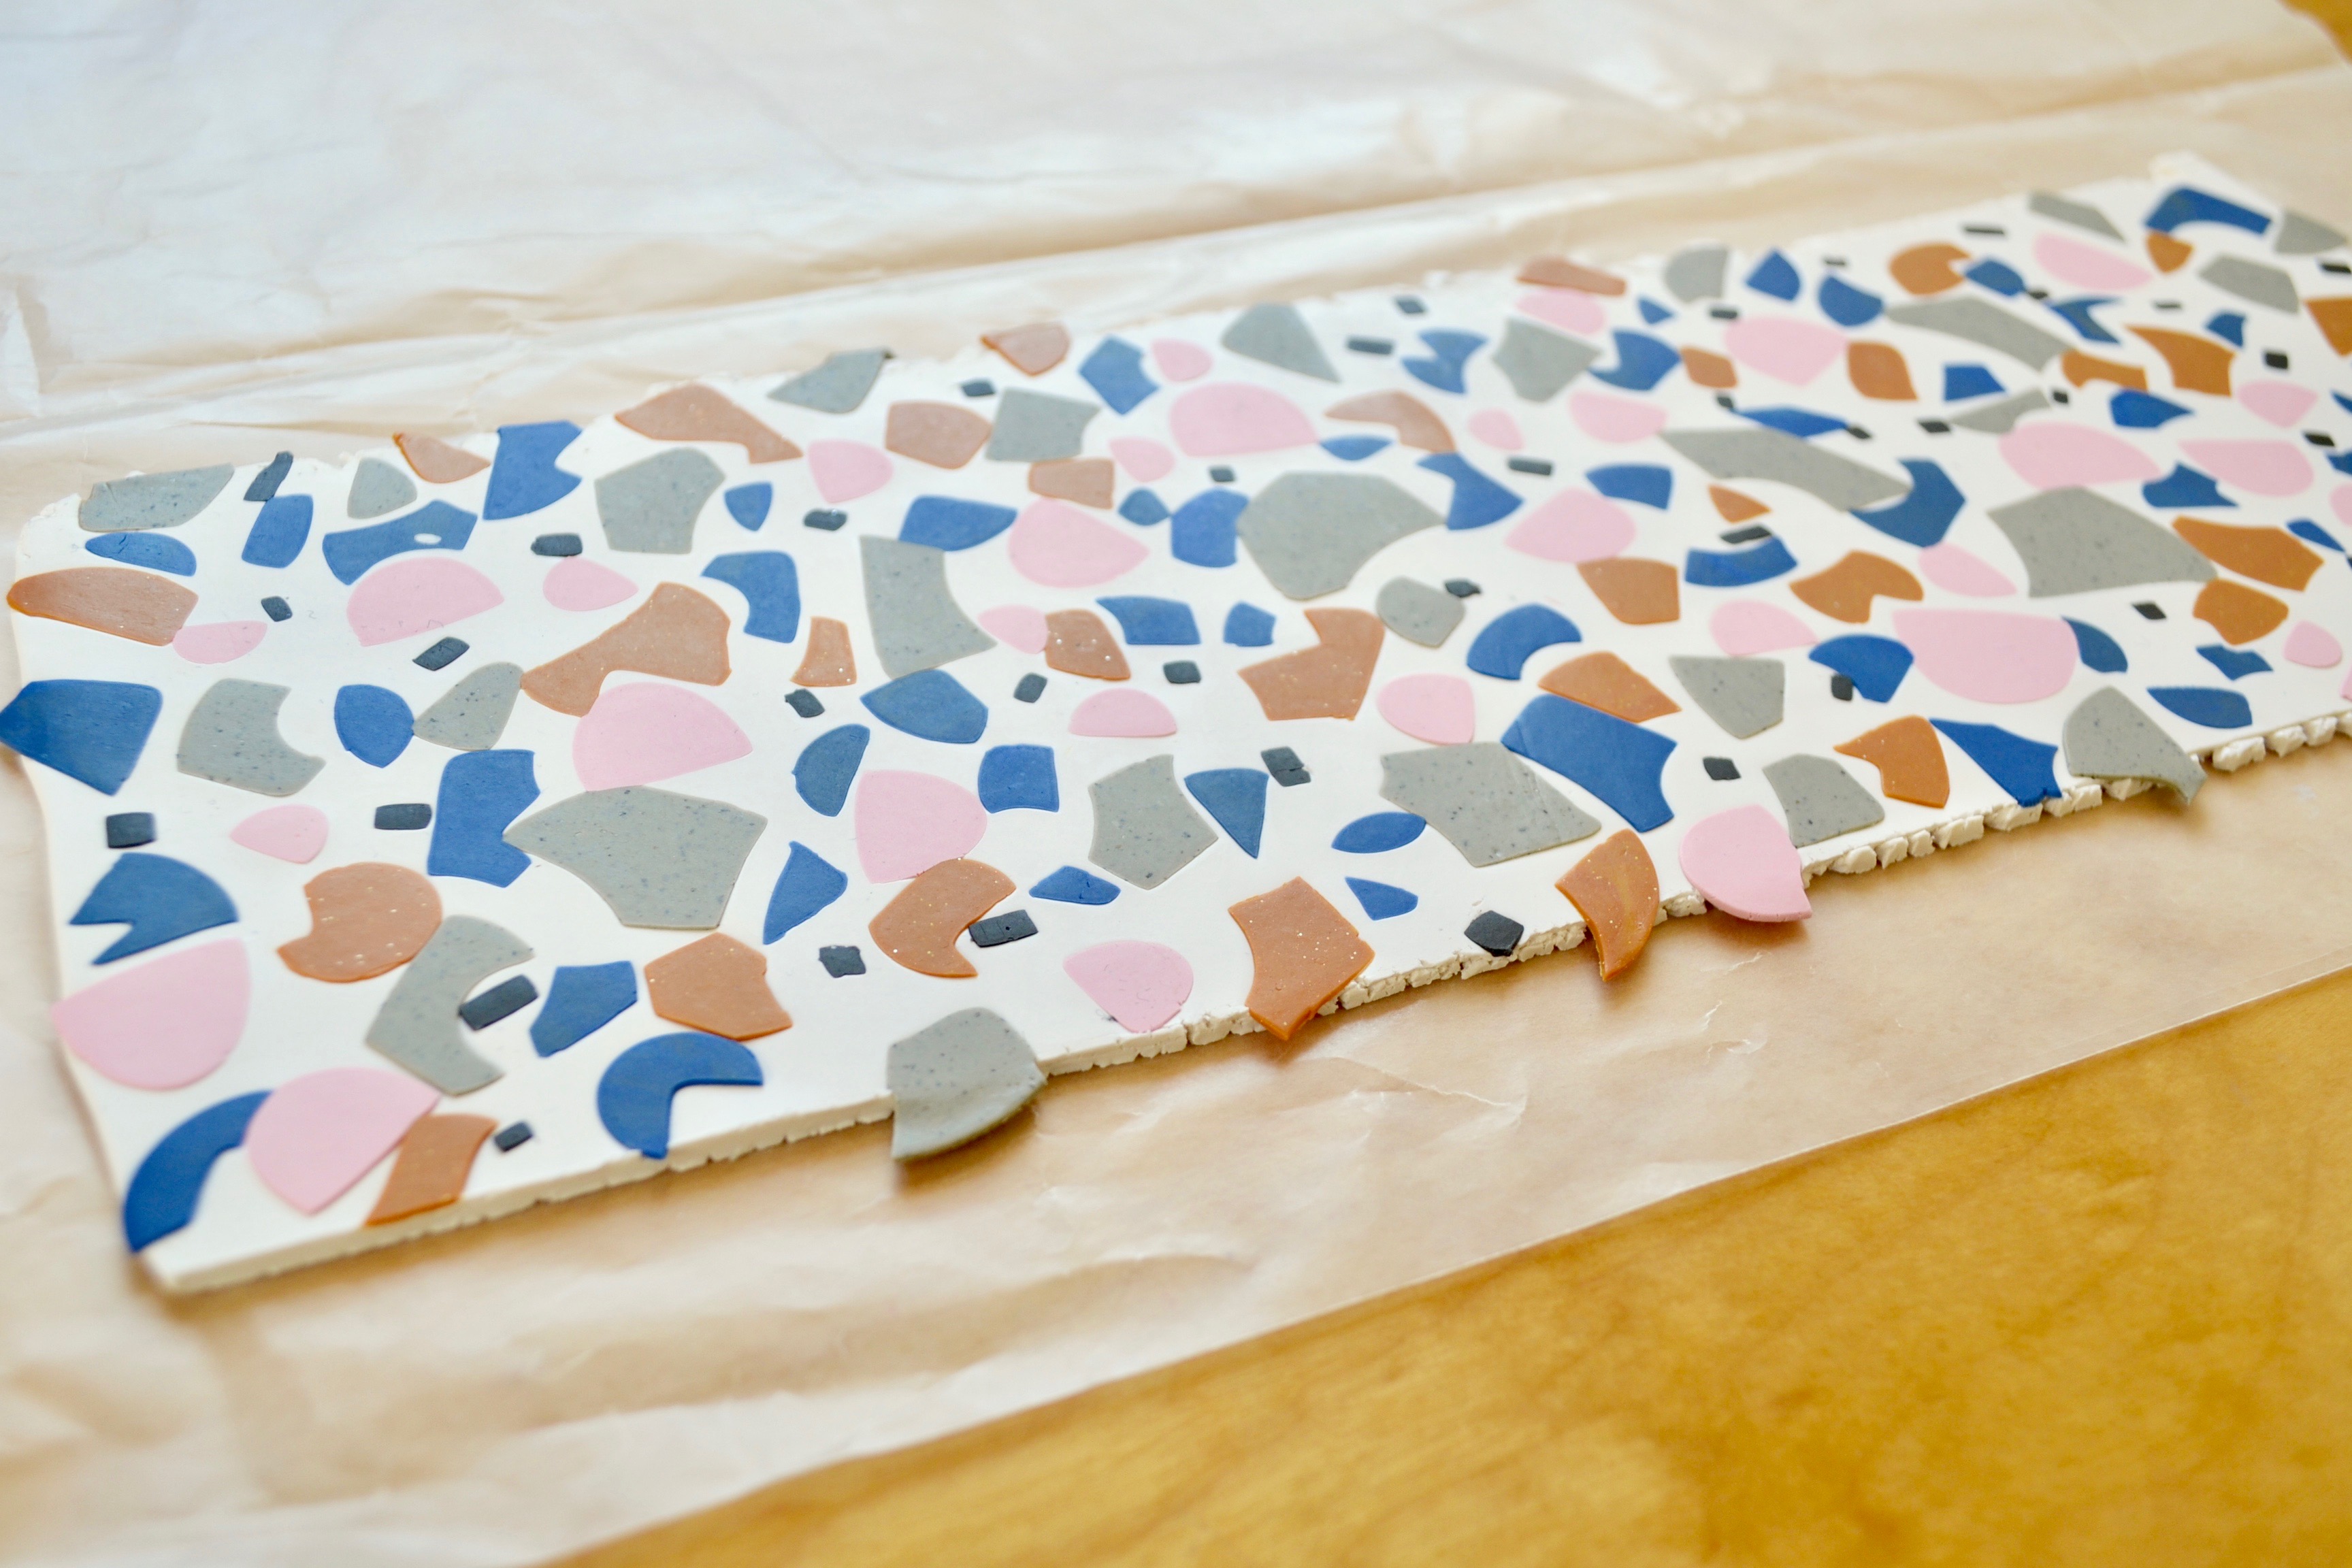
Your resulting slab might look something like this.
Place your slab between a folded piece of waxed paper and gently (just slight pressure) roll over the top to smooth the surface. Peel up the corner of the waxed paper periodically to check your progress. The goal is to smooth the shapes and the slab into one smooth service, but not to modify the slab and shapes by applying too much pressure.
Your slab may not end up being perfectly smooth, but smooth and integrated.
Now we will cut out the final rectangle for the slab. Place your paper template on the slab and place a light weight (here I’m using Altoid tin) onto of the paper so it does not shift while you trim.
Press your tissue blade against the bottom of your template and press down, cutting a straight line in the slab. Continue trimming your slab on the top and left hand sides. This will leave you with 3 nicely trimmed sides and one rough side that will be cut later.
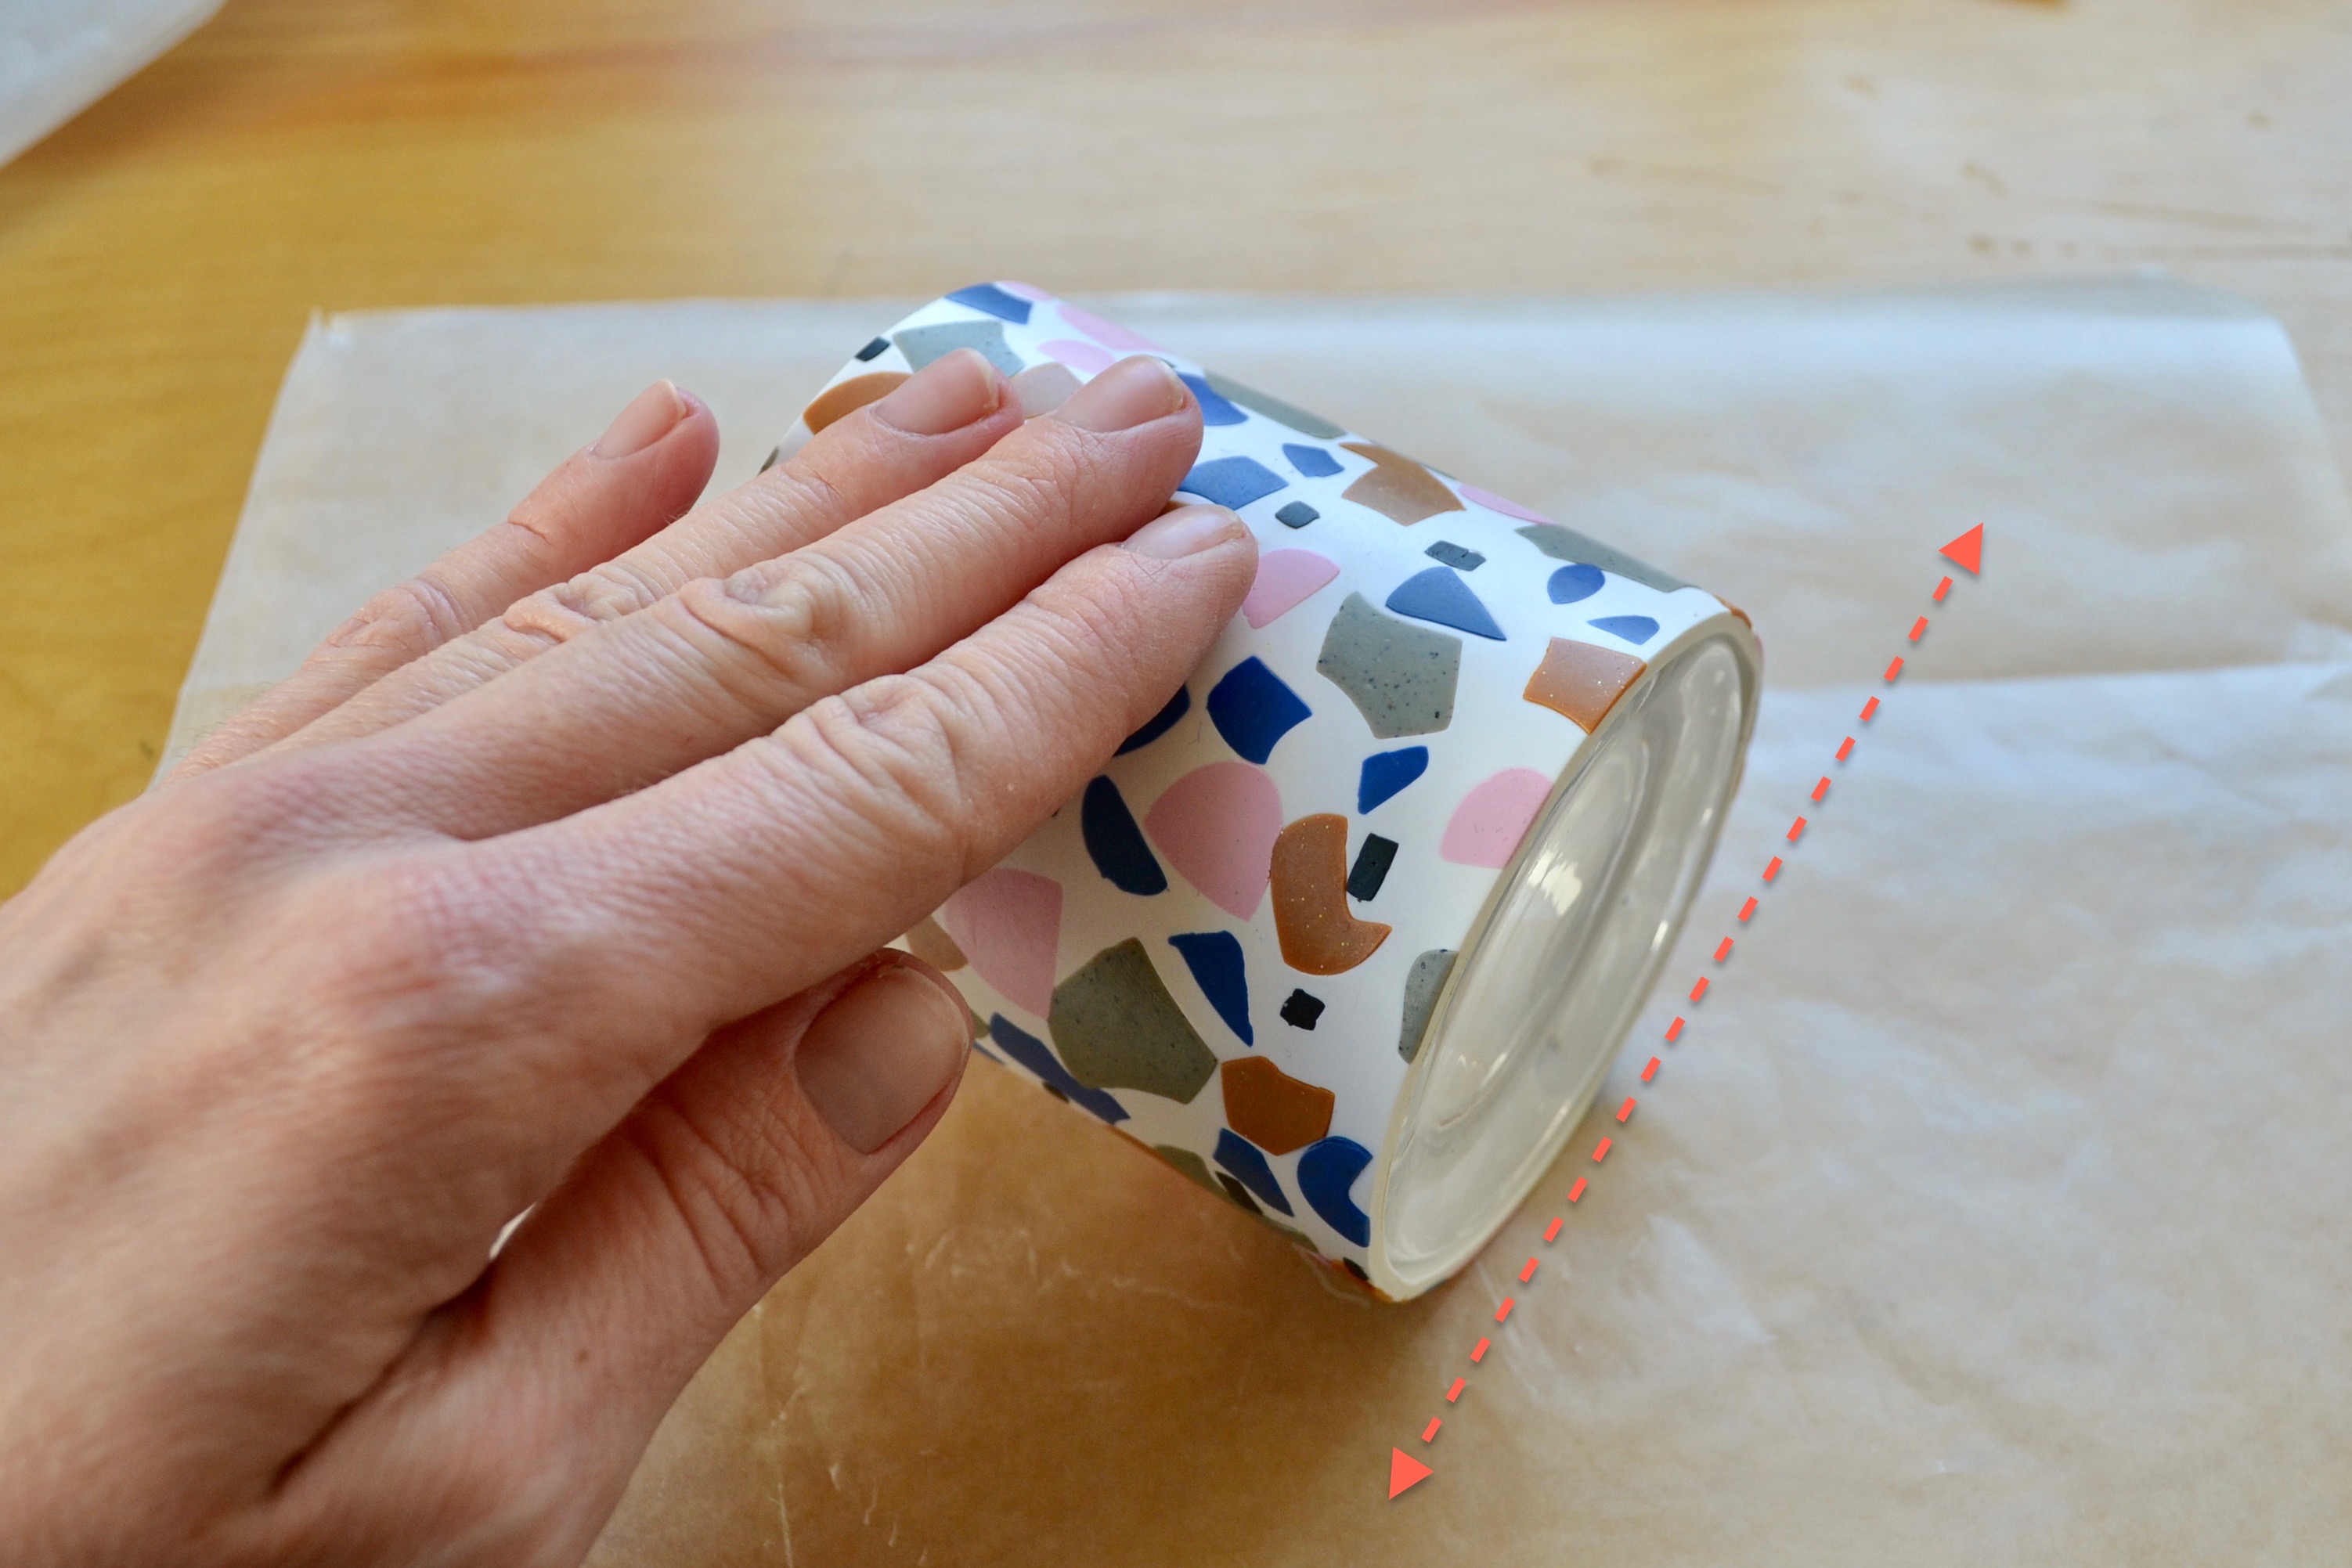
Place your base container on your work surface. Gently a loosely guide the slab around the container. Before the slab makes contact with the container’s surface, make sure that the slabs bottom edge is flush with the work surface (and the bottom of the container). We are lining up the bottom of the container with the bottom of the slab for a clean and neat result. This method avoids the need to trim the polymer clay once it is on the container, which is tricky, and also avoids the need to fold the slab under the container, which often results in an uneven, messy looking edge.
Gently press your slab onto the surface of the container, smoothing out air bubbles as you go. A plus of working with a clear glass container is that you can see, from the inside, if your slab has made contact with the container.
When you have worked almost all of the way around, lay your slab and container on its side.
Roll the container until the straight short edge of the slab hits the other side of the slab. Roll over slightly and roll back off. The straight edge should have left an impression on the slab. This will act a guide as to where we will trim the slab.
Cut the slab along the impression line with a straight blade. Err on the longer side with your cut. Line up your seems to check if your slab edge overlaps the other edge lay your piece back down and trim off a hair of you slab. Check the seam again. Your edges should sit flush with each other. It is better to be a hair short than a hair long. If the slab is a hair short at the seam you can gently push the two sides together. If it is a hair too long, the edges but up against one another and pull away from the container. This will effect the adhesion of the polymer clay to the container.
Gently smooth the seam with your finger.
Save the off-cut of your slab and set aside.
Gently Roll your planter on a flat surface to smooth any air bubbles between the container and the polymer clay.
Sit you planter upright and start to gently turn in the top edge of the slab.
It may be helpful to warm the polymer clay with a heat gun or hairdryer to regain some elasticity. Work around the edge slowly being careful not the crack the slab as you for it.
Flatten out the top edge of the planter my turning it upside-down on a flat surface, and applying gently, even pressure on the bottom. I think the flattened top edge makes the planter look more finished.
Here is my planter before baking.
Bake your planter and off-cut, following the directions on the package of your polymer clay. I place all polymer clay on ceramic tiles while baking to avoid scorch marks.
IMPORTANT: When you pieces are finished baking, turn off the oven and let the planter cool IN THE OVEN. This step allows the glass to cool slowly, avoiding the risk of it cooling too fast and breaking.
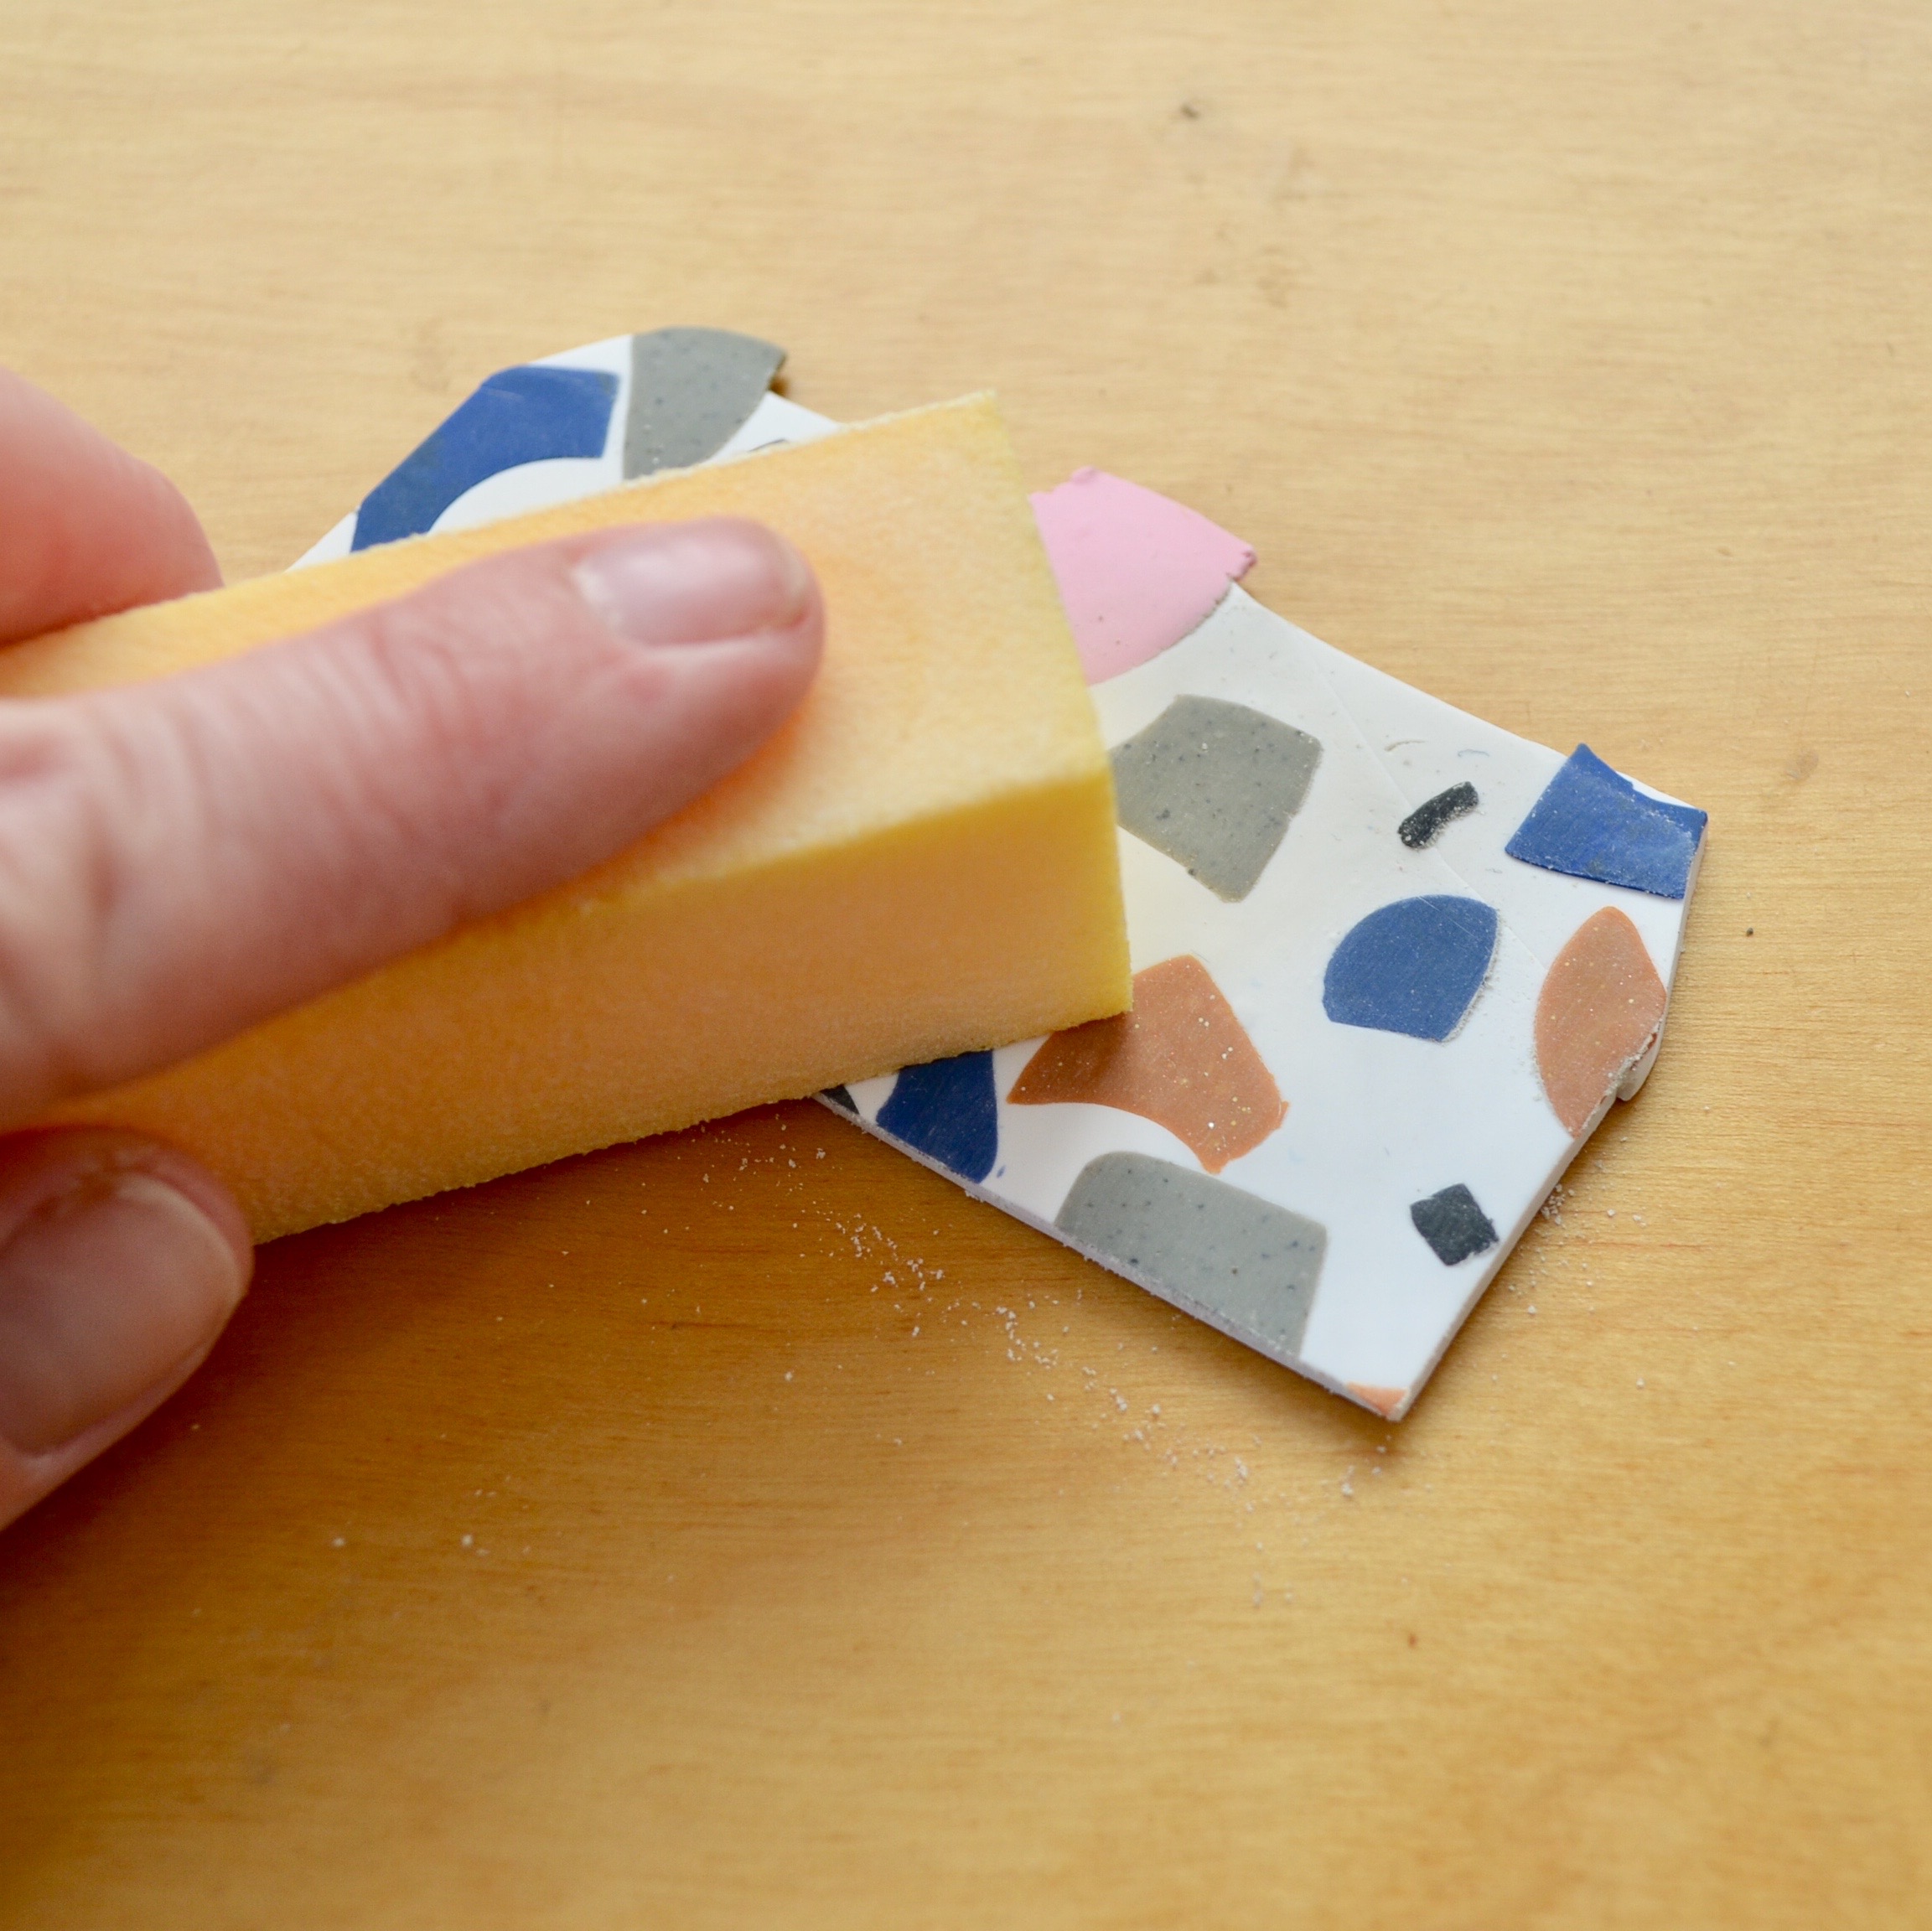
Saving the off-cut of the slab allows you to test various finishing techniques before you try them on your planter. From the right grit of sand paper to the right finish, it is better to test it first on your off-cut!
Here I am sanding the surface of my planter with a nail buffer. Nail buffers are like super-fine grit sandpaper, and they are easy to hold. White polymer clay in notoriously hard to keep clean. A light sanding will easily remove surface lint. Wipe off sanding dust with a damp cloth. Let dry.
Apply 2-3 coats of Sculpey gloss, sanding between coats if desired, to add the finishing touch. Tip: place the planter on top of a smaller object so you can apply the gloss to the bottom edge at the same time.
Congratulations! You have made a beautiful planter. I hope you had fun!
Hello and welcome! This is my very first post on my very first blog! Lifeofmaking.com is a blog centered around a broad range of craft tutorials. I’m so glad you are here!
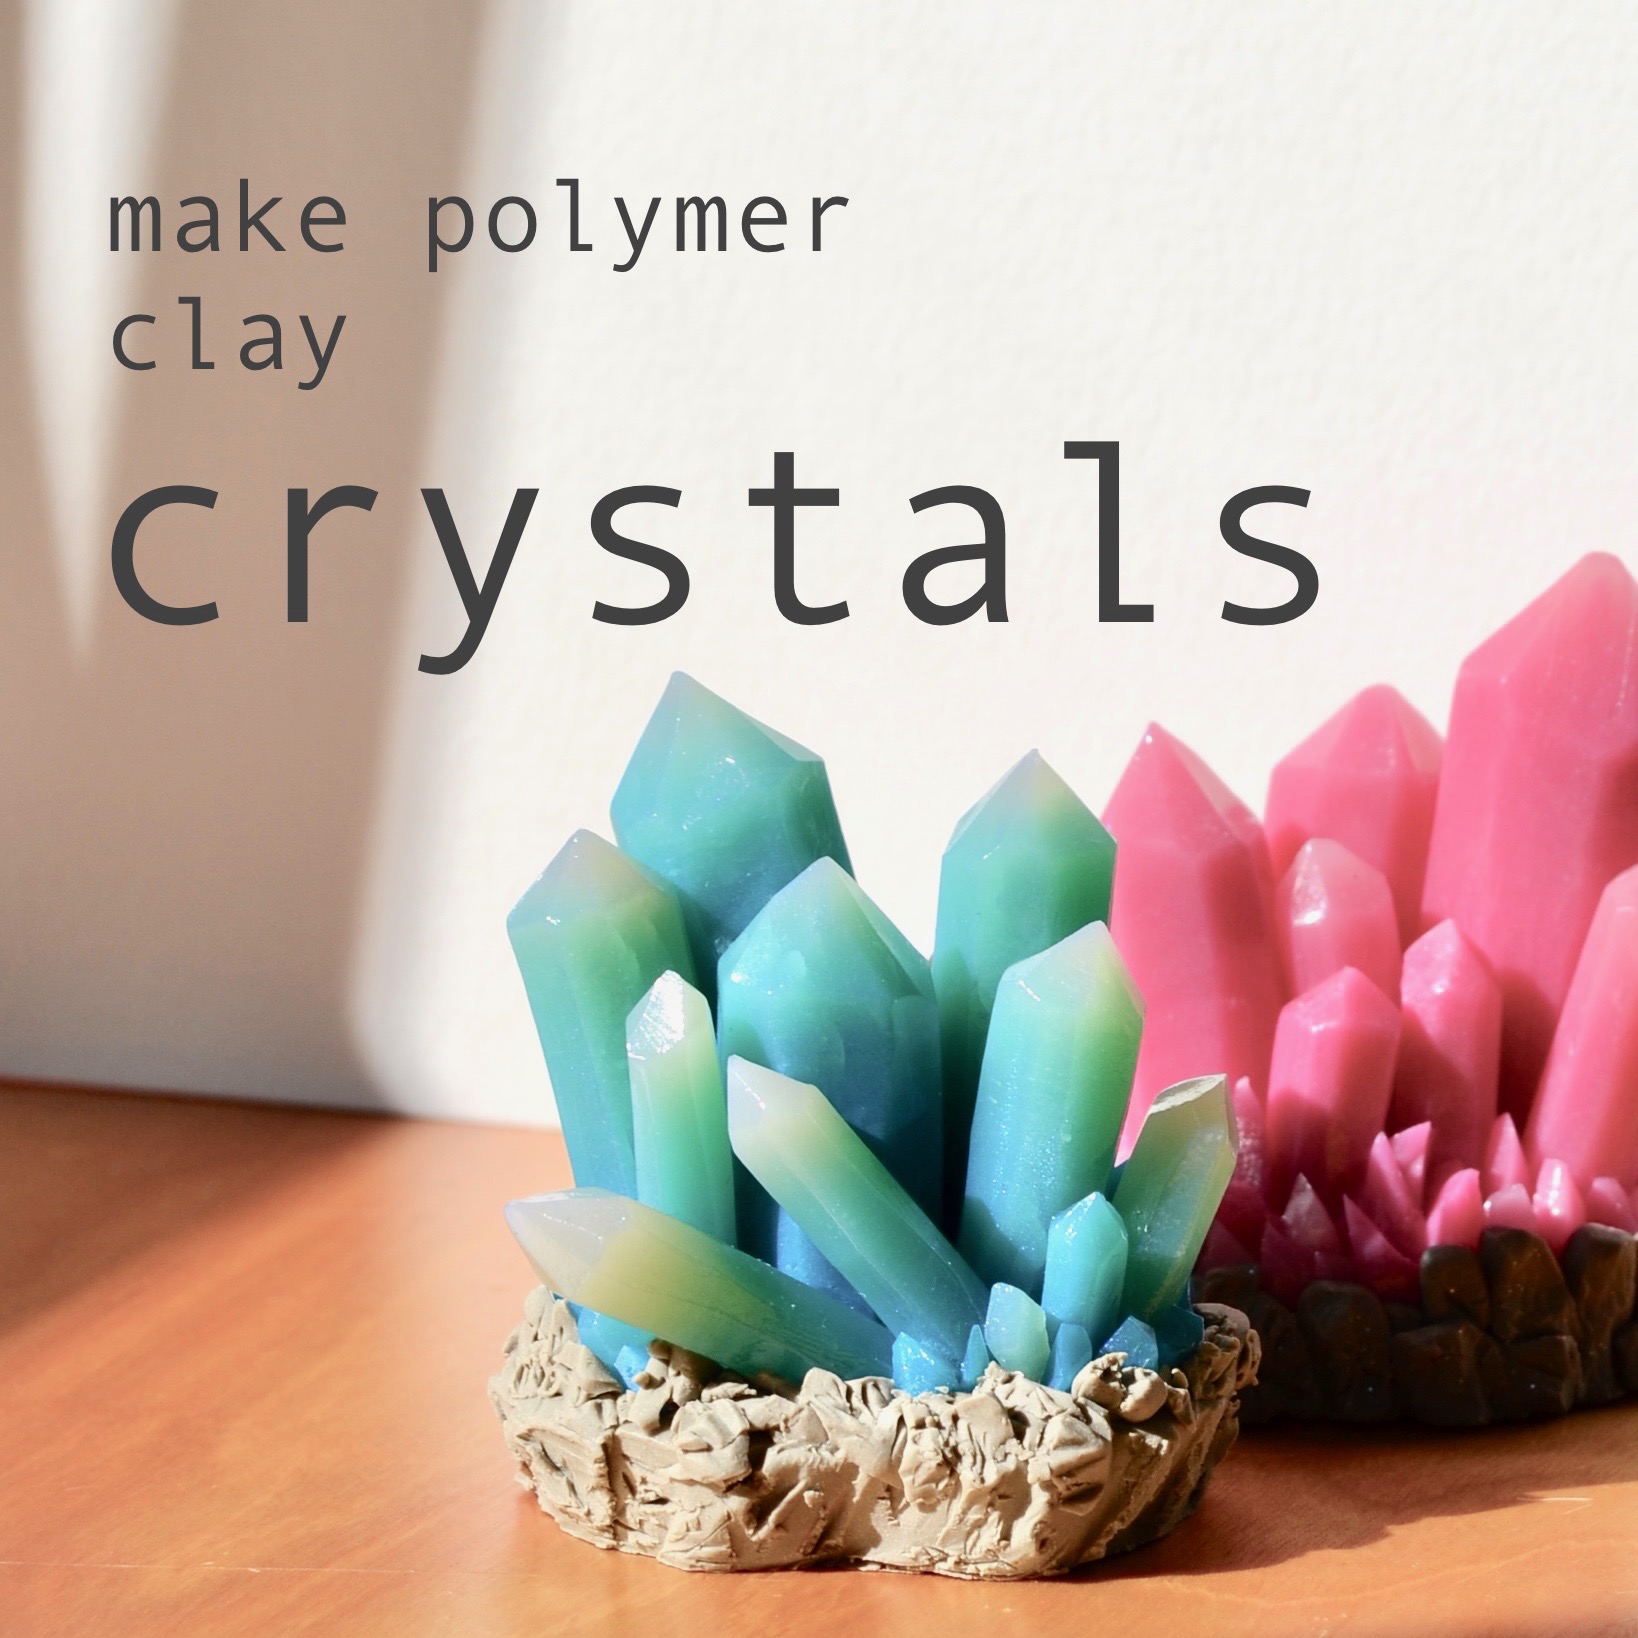
These polymer clay crystals are so cute and super fun to make! I will show you how to create crystal points that fade from deep color to light translucent points. I hope you enjoy this photo based tutorial, and I hope you find it thorough and easy to follow. Let’s begin!
Knead and blend 1 part translucent polymer clay and 1 part color of your choice. Pictured, about ¼ of a standard block of polymer clay constitutes 1 “part.” Knead 2 parts translucent clay.
Here I am using Sculpey Premo- White Translucent and Peacock Blue.
Roll both balls out in an elongated oval. Place 1 on top of the other. You may want to place a sheet of waxed paper between the layers at this point. Square off your stack into an elongated rectangle.
Cut your rectangle on the diagonal and separate the layers, creating 2 rectangles like the one shown (bottom).
We will now take this bi-colored rectangle to make a Skinner Blend. (There are many good tutorials that go into depth about this technique, and I am soon going to write my own soon). Fold rectangle over length-wise and feed through your pasta maker, or roll out. Fold over length-wise again and repeat the process several times, making sure you always fold the clay in the same direction.
For our purposes, we want to keep a long thin shape. Often if you feed through your pasta machine, or roll it out with a roller, your Skinner Blend will widen out. To keep it from doing this- while you are feeding the clay into the pasta machine, place one side of the clay against the side. Take your pinky and place it up against the other side of the clay. Crank the clay through with your other hand, keeping your pinky in place. This will prevent the clay sheet from widening.
You should end up with some sheets of clay with a nice ombre effect, like this.
Square off your sheet of clay into an elongated rectangle. The size is not important. Make your rectangle as large as your clay sheet will allow, conserving the most of your ombre sheets of clay.
Starting from a short side of the rectangle, tightly roll it up into a cylinder. Go slow and press down gently from the center outwards as you roll to ensure that you are not trapping any air bubbles.
Here is a chance to modify the size of your cylinder (that will eventually become a crystal point). If it is too long, you can reduce its length by alternately compressing the ends and gently rolling it out. This will compress it without distorting it. If you want to lengthen it simply roll it out with even pressure. This will elongate it.
If you find yourself with a cylinder of clay that is simply too big, or you need more smaller sizes, you can cut one in half lengthwise. Then take each half and gently roll and shape it back into a cylinder. Compress to shorten if necessary.
Repeat the process of making the ombre cylinders until you have a nice variety of sizes to work with. For this project I ended up with cylinders ranging in size from 3/8” x 1.5” to ¾” x 2.5.”
Gently push or roll the sides of your cylinders into a more squared off shape (This step helps conserve a bit of the mass of the clay for the next step).
At this point, let the clay sit in a cool place for at least a few hours. This is important for the next step of cutting the cylinders. If you have worked the clay for a while it is warm and elastic. We need the clay to set and firm up a bit for the next step.
With a tissue blade or an X-Acto blade, cut straight down the sides of the cylinders, as shown, cutting down 4 sides.
Then cut down the sides again, as shown, cutting off the corners. You want to end up with an octagonal cross section, but it does not need to be perfect. Crystals in nature to on infinite shapes and sizes, and the variation in cut adds to the charm of these pieces.
TIP: When you are cutting, cut from top to bottom. Also I like to taper in a bit at the base. I cut at a slight inward angle, making the base of the crystal slightly smaller than the top.
Keep your shavings, we will use them later.
Lay the crystal on its side and cut the top end (light end) as shown. Rotate a quarter turn and cut again as shown.
Continue to cut more facets in the point. You can cut more than 8 side on the top and the sides. If one cut ends up not looking right go ahead and cut again at a slightly different angle.
You should end up with a crystal that looks something like this.
Go ahead and make a good assortment of different sizes of crystals to work with (I made all of these, but only ended up using 2/3 of them).
Now we are going to put the crystals together into a cluster. Get a small piece of waxed paper on which to make your arrangement.
Start arranging the crystal points. You want the bottoms to sit flush with the wax paper. It you want a crystal to sit at an angle, cut the bottom at an angle as shown.
As you add the crystals gently push them together in a cluster.
Continue to add to your cluster, mixing sizes, and adding crystals at skewed angles if desired.
When you are happy with the main elements of your crystal, we will move onto making the rock base. Here I am using Sculpey Souffle- ½ block of Concrete and ¼ block Latte. Blend the two colors. Roll into a ball, then roll ball into about a ¼” pancake.
(Sculpey Souffle is a formulation designed to work well in thick clay pieces. Ordinary polymer clay has a tendancy to crack after baking if the piece it too thick. Also Souffle has a matte texture to it which I think works well for stone.)
This step is optional, but I think it is probably a good idea. Take Translucent Liquid Sculpey (TLS) and smear a thin layer on the pancake. This will act as a “glue” between the crystal and the rock base. They will stick without it, though, so it is not entirely necessary.
Gently lift your crystal cluster and peel away the waxed paper. Place it in the center of your rock pancake.
Take the ombre crystal shavings that you set aside and roughly chop them up. We will be using them as smaller crystals around the base of your cluster.
Add small crystals around the base to your liking. Gently push onto the piece.
Remove the excess clay on the rock base.
Take the rock base scraps and roughly chop them.
Take the chopped “rock” and add to the base of the crystal. Shape the “rock” to your liking.
Bake your crystal according the instructions on your clay’s package. For my piece, I baked it for 1 hour at 275ºF. Let cool completely.
To add a nice shine to your crystal, apply 2 coats of Sculpey Gloss Glaze to just the crystals, not the rock.
Congratulations! I hope your crystals are super adorable and that you love them!